Our Own Electric Company, Part 2
Several weeks ago, I started looking at the electricity needs of our Happy Boolo home. Today, I’ll look at what we’ve done so far during the project to get us there.
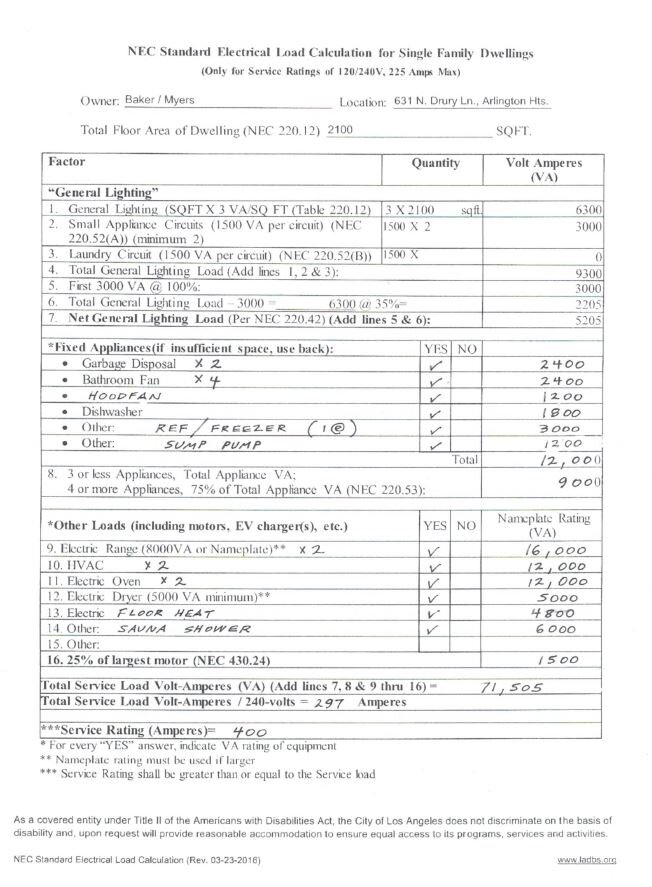
To start things off, I’m going to post the same chart from Part 1 (updated with more appliances I’d forgotten to add last time).

Again, a reasonable reaction might be “wow, your electricity needs are going to skyrocket!” That is absolutely true. A later post will take a much closer look at the two things that really determine a home’s electric usage: heating and cooling. The electricity each of the other appliances on this list will consume can be projected (watts over time), but in reality, we won’t really know how much our total electrical consumption will be until we actually start using appliances and living in the home. The idea is that the tight thermal envelope will reduce the need for heating and cooling, the use of all LED lights will consume less electricity, and EnergyStar appliances will use electricity more efficiently. But then:
Using a bidet toilet means using electricity for the spray nozzle and electricity for the heating element to warm the water passing through the spray nozzle.
What if we become addicted to the sauna?
What if the clothes dryer requires two (or three) cycles to dry clothes versus the one we used to get from our gas dryer?
The bottom line is that there’s still a lot of unknown electrical consumption.
But what was certain back when we were in the design phase for the home’s electrical infrastructure was that we’d be moving from our prior 200-amp service to new 400-amp service. Our expert electrician, Steve from Veteran Electric, performed the calculation for permitting purposes and ended up with a rough estimate of 297 amperes (though our design eventually did not include garbage disposals or bathroom fans). Because there’s either 200-amp or 400-amp service (no 300-amp service), our new service rating would be 400-amps.
So, we knew we’d have more electrical appliances and that our service would need to increase to 400 amps, so our electricians started building our electrical infrastructure, which started with two 200-amp circuit breaker panels and re-locating our meter pedestal to the northwest corner of the house to maintain our overhead connection to ComEd.

Not so scary… almost familiar.

Definitely scary… no touchy.

Brian has it under control… not so scary again.

Steve does a balancing act on the new deck framing.
Once the basic building blocks for the electricity were in-place, we met with our architect/GC, interior designer, and electrician for a walk-through to identify preferred outlet, light, and switch locations.

The practicality of the open truss ceiling gives Steve “conduit joy”.

Mike K points the way… where the light will fall.

Now it’s Julie’s turn to point.

Amy verifies bedside switch locations
Outside, the meter pedestal was installed at the northeast corner of the house with two 200-amp legs of power running through separate conduits along the back wall of the house under the deck framing, where each penetrated the wall to terminate into each breaker panel in the utility room. The above-ground service line was re-directed to pass through the meter pedestal.
In order to get 400-amp service from ComEd, we had to have our power line buried. The technique used — directional boring — is similar to digging a tunnel underground without having to dig a trench. This has the advantage of not disturbing the topsoil while at the same time improving the practical (no power line to interfere with a tree’s growth) and aesthetic (no unsightly power line going across the backyard).
What’s neat about this technique is that a conduit for the electric line is actually run through the tunnel as it is bored by the machine — a tunnel which is “directionally” bored by a small hand controller, which allows the operator to adjust the angle to make sure the business end of the auger ends up at the desired location. We had two conduits installed at the same time — a larger conduit for ComEd and a smaller conduit for Comcast — so both our electric cable (shielded) and our Internet cable (shielded) will run underground from the service pole to the house. This leaves the unsightly AT&T cable, which, as of this writing, still needs to be removed from the line (we cancelled our landline service 10 months ago!)

The Path… from pole (just off-camera to left) to pedestal (bottom/right corner of house)

The Process… directional boring auger starts its tunneling at the meter pedestal…

The Presentation… and ends its journey at the pole. Ready for ComEd and Comcast!
Weeks later, ComEd arrived on the scene to disconnect our above-ground electric service to switch it to our below-ground service, which required a brief intrusion by ComEd’s “electric tank” into a neighbor’s backyard (who will eventually receive some Happy Boolo cheer for their cooperation!)

Connection Day by ComEd
So, we’ve got a buried power line that still connects us to ComEd, detailed light/outlet/switch locations, 400-amp service to power it all, and a long list of electrical appliances.
Thanks to Steve and Brian from Veteran Electric for their excellent design and installation — we’ll see them again soon as we near the end of the project!
And that’s where this post will end to set up the next story in our electricity journey… Solar Power!